I'm exited to let you guys know we can now customize bottle cap images for your projects. On our Facebook page you will find an entire album of things you can have added to bows, necklaces, earrings, key rings and more! A lot of the Disney images were obtained from a blog site. (Ilikebigfreebies.blogspot.com). I noted which ones were obtained from that site as well as a link to find the files yourself if you're a fellow crafter looking for cute add-ons to your projects. As for the A-Z letters, those were created by me, from a template file. An author at the freebies blog was very harsh when she discovered that one of my associates posted her images for sale on etsy (as is her right). I have removed those images as well as bringing it to the attention of the poster. But because my name is the primary one associated with CCBG I am the one in the spotlight and take responsibility for those I allow to post on my behalf. I want to apologize to you, our fans because it appeared that our business was trying to "scam" others. It wasn't my intention and I am sorry for the negative attention it brought us.
Now that we're beyond that, feel free to look though the album, request any of them to be added to your bows or request something you may not see. I have a lot of resources ilikebigfreebies.blogspot.com posts new images constantly, or I can purchase what you desire if it's beyond my scope of creation.
Thank you for your support of CCBG and I hope you're all enjoying a peaceful Memorial Day! Be sure to pause and remember and thank those who make it possible for you to eat your burgers in the sun.
Monday, May 26, 2014

Sunday, March 9, 2014
DIY Body Wash
I will admit it: I've been on Pinterest entirely too much lately. But I have learned wonderful things to clean green, spring clean, and make my own puppy chews. But today I'm trying out diy body wash. Here's what I used:


Old pump style lotion bottle, rinsed out
Bars of soap, shaved with cheese grater
Homemade hand scrub
Lotion
So. Grate the soap. Seriously. Your cheese grater will look like this when you're finished:
I grated my soap over a saucepan. I used three travel bars. Seriously. From a hotel we stayed at on our last vacation. Mandarin orange. Then I filled the pan with water and set the heat to Medium. It will be lumpy at first and will need constant stirring. Then it will get a little foamy, like this:
I'm using a slotted spoon so I can tell when all the flakes are melted. Now that they are I've removed the pan from the heat source, turned the burner off and will let it sit for about twenty minutes. While that's resting I'm going to go clean the bathroom. Be back in a few!
***********************************************
So. I cleaned the bathroom and dusted. The mixture isn't completely cooled, but I didn't expect it to be. There was a light film starting to develop on the top but I scraped it off. (Update: research and different methods show that if you add more water during the melting process this film won't develop). Now it looks like this :
Time to take this over to my other supplies:
I'm going to pour the mixture into the lotion bottle. Wish me luck!!
*******************************************
That wasn't so bad. Only a minor spill. If you have a funnel I recommend using it. :)
Now to decide whether or not to add hings. It's a grey soap/body wash as it is but I like to feel great and silly smooth. So I'm going to add one tablespoon of my favorite moisturizing lotion. (The mixture is still hot so this will combine well. I put the pump top back onto the bottle and shook it (over the sink--it will leak slightly) until I felt it was blended. It was after all only one tablespoon into hot liquid. Now to add my homemade body scrub. (Available for purchase at www.facebook.com/creativecuties). I'm adding one tablespoon of it, because it has oil in it and I don't want to slip in the tubby!! Again, I repeated the step of putting the pump on and shaking. Now it's ready to use! You guys hang out here, and I'm going to go try it out!
*********************************************
Ta-da!!!!!! Out of the tubby and feeling so fresh and clean! A few notes: bar soaps tend to make my skin feel a little drier than body wash so the reaction I felt after the shower was what I expected it to be. I will use my fave soap next time. (It doesn't make me feel super dry). Most importantly, you know your skin. Go with what you love and remember, it's all an experiment anyway! Bar soaps are cheaper than body wash so if you're not happy with the result you're not likely to be out very much financially. I leave you with this: don't write on your lotion bottle with sharpie then place said bottle into tubby. The market will run and you'll end up washing these weird streak away instead of enjoying your tubby!!!
Saturday, February 22, 2014
DIY Headband Holder
So today I'm going to show you all how to turn a 42 ounce dry oatmeal canister into a cute and sassy headband holder for your princesses and divas! Here's what you'll need:
-Empty and cleaned oatmeal canister (I'm using quick oats, 42 oz)
-Fabric of your choice
-Adhesive of your choice (I'm using hot glue)
-Scissors


Now I don't know about the rest of you but I have a total princess. So I decided to add some cute flowers I had on hand.


-Empty and cleaned oatmeal canister (I'm using quick oats, 42 oz)
-Fabric of your choice
-Adhesive of your choice (I'm using hot glue)
-Scissors
-Ribbon for trim (optional)
-Flowers for embellishment (optional)
First step is to measure and cut your fabric. I was lucky. This scrap of ballerina print left over from an order is the perfect size. Now let's get sticky!
I started with a not so straight line of glue. Then I aligned and pressed the fabric down to smooth the glue and prevent a rough line underneath.
Next, wrap it around, making sure to stay aligned with your top edge and glue along the entire length of your fabric. (Yes, I only used two strips of glue: one at the start and one at the finish).
I decided to add 3/8" purple grosgrain ribbon at the top as a trim, gluing it all the way around.
Now let's talk about the bottom. You can trim yours to just the bottom edge so you don't have to glue it or you can glue. Mine was again a practical perfect fit so I opted to glue. Like this:
Isn't that precious? Now let's add some headbands!
I opted to add bows, her hair ties and her brush. Because I added flowers, the top went into the recycling bin.
Very simple, a quick project and it warms my organization loving heart. Have fun with your own or, if you decide it's too much to try just pop on over to Facebook and order one from us! www.facebook.com/creativecuties
Saturday, January 18, 2014
Something Different
O.k. So normally I boast and brag about handmade, creative things. But, I feel obligated to speak about a product that I was given for free. (Who doesn't love free?!) Have any of you ever heard of Bzz Agents or Bzz Campaigns? Well, I signed up about one year ago, and have received different things to try out and review online and to my peers. This time I received a razor. It sounds simple enough; a razor is a razor, right? NOOOOOO. I beseech you (busting out the big words today) to give this razor a shot. I don't know about you all, but to me nothing sucks more than shaving in a shower during winter when you're freezing your bum off. I mean, the water is hot, you shave, you get goose bumps, your hair magically reappears out of nowhere, you shave again and end up cutting yourself or having some form of razor rash or burn. (Maybe I'm shaving wrong...who knows). The point is, if you have experienced any type of irritation from any form of shaving, you should really look into the Schick Hydro Silk Sensitive Care. Yes, that's a large name for a tiny razor but it is SO worth it. I've been using the razor for about a week now and I love that my arms, legs and intimate areas don't seem to be aware that I'm shaving at all. The blades are surrounded by this pretty cool moisture thing; it's not just a strip; it surrounds the blades almost like a Venus, but it's not shave soap. It's moisturizer and soother all in one shot, but I don't feel slimy. (Did that make any sense? I have a head cold if it didn't...blame the mucous).
Anyway, Bzz Campaign sent me the free razor and I felt that I should shout from the roof tops how awesome it is. A blog is my version of digitally shouting aloud. Here are some reference links for you to visit if you're interested in the product:
The facebook page:
https://www.facebook.com/SchickHydroSilk
The product page:
http://www.schick.com/us/hydro-silk.shtml
And if you want to become a Bzz Agent and get awesome things:
www.bzzagent.com
ENJOY!!!
Anyway, Bzz Campaign sent me the free razor and I felt that I should shout from the roof tops how awesome it is. A blog is my version of digitally shouting aloud. Here are some reference links for you to visit if you're interested in the product:
The facebook page:
https://www.facebook.com/SchickHydroSilk
The product page:
http://www.schick.com/us/hydro-silk.shtml
And if you want to become a Bzz Agent and get awesome things:
www.bzzagent.com
ENJOY!!!
Saturday, September 21, 2013
It's Costume Time!
Seriously. I adore making tulle costumes. Peacocks, cats, witches, princesses, characters, superheroes and so much more! Do you want to see some of my work?

I've also done so many more and am working on new ones for this season! And tutu costumes aren't just for Halloween! We can also do Santa, Snowmen, Elves, and holiday movie themes as well! (Nightmare Beore Christmas, How the Grinch Stole Christmas, etc).
The best part is that these costumes are 100% customizeable and durable enough to last through the holiday and endless playtime after!
Be sure to contact me via facebook (www.facebook.com/creativecuties) or email (creativecuties.sc@gmail.com) for pricing and customization. And remember, all my costume prices include any hair flair/headpieces, and accessories (wings, wands, etc) and can typically be completed within ten days of payment. Coordinating treat bags available at small additional fee. I look forward to hearing from you!
Saturday, August 31, 2013
Apron Tutorial
So thanks to a number of factors, I happen to have an extra men's dress shirt lying around that my Medic can't wear. So I decided to turn it into an apron and show you how! Now there are many tutorials online that show how to make this, but I don't happen to have all of those links readily available for you. Any duplication of their wording or "steps" is coincidental and unintentional.


Because I don't have a rotary cutter, I drew a line to mark what I needed to cut. 
Cut along your line, and flip piece you've just cut onto other side to ensure they're even.  Draw a line and cut section away. Now you have the basic apron. It's time to make it fictional. For straps you have several options. You can use ribbon, or even a different fabric for a unique look. I opted to use the back of the shirt and cut strips for my ties.
 Now it's time to pin all out rough edges.
  I pinned one end of the tie straps so they would have a more finished look.
  Now you can thread your needle, or drag out your machine. I opted for machine. Isn't mine pretty??
 I started by sewing my straps first
  Then once they were sewn I did this frustrating thing:
 Once they were turned the right way, I pinned them to the inside of the apron.
  Time to sew it all.
  Once all the rough edges were sewn, I trimmed all strings and overhang of fabric. (Because I'm that girl). But once that was completed I had my very own apron!
So, do you have a ton of dress shirts laying around that don't fit your husband/boyfriend, dad, grandfather or even son anymore? Turn it into an apron! I've alway heard "waste not, want not" and this up cycle is a great way to reuse something. So what do you need?
-men's dress shirt
-scissors
-needle and thread (or sewing machine)
-ruler
-straight pins
Now what do you do?
Well, you start with a dress shirt like this:
Then you cut the sleeves and back off. Trim as close as you can to the collar, like so:
When you stand and look at your shirt, this is what you should see:
Now we need to shape the apron. I used a seamstress tape measure but anything with a straight edge will work (ie cutting board, ruler, piece of paper, etc). Lay your straight edge on top of the shirt from armpit to shoulder.
Many thanks to Pinterest for the inspiration. (Even if those directions are in Russian). Now if I can just find more unwanted dress shirts I can show you how I turned one into a dress for Munchkin!!
🌸Jenny🌸
Monday, July 22, 2013
Another recommendation
Since you guys don't seem too interested in what I'm doing I thought I would once again make an entry on something I saw on Facebook or Pinterest and tried for myself. So here goes:


Hardwood floor polish. Yes. Hardwood floor polish. Our home is hardwoods throughout aside from the bathroom and lichen of course. But I saw this thing on Facebook, about a recipe for a hardwood floor polish concoction. So I figured why not. This is the recipe:
I made the following changes: I don't know about the rest of you, but olive oil is expensive!!!! I can't afford to just toss it on my floors. So I use a different type of oil. Also, I did not have lemon juice in a bottle. But I did have lemons. (Yes, I'm THAT mom). So there I am, literally squeezing lemons in my kitchen and realize three lemons only yielded about one quarter of a cup. So I squeezed a few lines. I thought 'citrus is citrus'. Anyway. I put the oil and lemon/lime juice into my bucket and added very hot water. Then I sloshed it around win my mop. I wrung it out well as stated in the image and began to mop. I mopped all of the hardwood floors in the house and once the floor was dry, snapped an 'after' picture. (Don't worry. I took a 'before' picture as well) This is what I ended up with:
The before picture was taken with natural lighting, and the after was snapped with the overhead light on. But you get the general idea. It is something that I may make a monthly routine but I will need a second mop. This is why:
There are things these Pinterest and Facebook posts don't tell you. Enter Jenny.
1) mix concoction well or it will look like you're just swabbing oil into your floor
2) it takes forever to rinse the oil out of your mop so perhaps you use a second mop entirely for polish
3) the bucket will be oily when you're finished. Dawn dish detergent gets the bucket clean. If you can remove your mop head, toss it in the washer alone and add baking soda to your detergent. It helps.
If you have a better remedy to keep hardwood floors looking awesome, let me know!!!!!!
Oh, I you want something else reviewed just give me a shout. I love this stuff.
Saturday, July 13, 2013
A few of my favorite things
So, I was introduced to a talented woman named Heather through an auction I participated in. (www.facebook.com/adoorablewreathsbyheather)


She is amazing. And offering so many wonderful thing. Seriously. Lets talk rhinestones. I'm good with them on shoes, bouquets, bow organizers, etc. but a badge reel? No. But Heather. She can do anything. I was the gracious recipient of a free reel for participating in a giveaway she held. (I paid shipping) oh my goodness it's beautiful!!
See. It's wonderful. And I'm so excited for it to arrive. But that's not all she can do. Her newest product is flamed cell phone cases. Now. You've seen glam, but you haven't seen "Heather glammed". And she can do anything.
She's clearly a Texans fan but can do practically anything your mind can conjure. Heather hosts multivendor auctions quite frequently and the creativity you'll find on her page (A-Door-Able Wreaths by Heather) is endless an astounding. So when you stop by, be sure to tell her I sent you as enjoy her wonderful things.
Oh...and her wreaths? They're awesome.
Friday, July 12, 2013
July is half over?
Yes. Sadly 2013 is zooming by. I'm not certain to what level it is speeding for you all but for me it is rapid. I seems as if time passes more rapidly these days. Or perhaps I'm just an old lady now. :).
I wanted to post a tutorial today but no one mentioned anything that they would like to see. So instead, later tonight once my Munchkin is in bed I will post about a favorite product of mine.
And just in case anyone is actually reading my blog, of you visit the Facebook page and place an order, mention this entry and you'll receive free item with purchase AND discounted shipping rate!
www.facebook.com/creativecuties
Sunday, June 30, 2013
Dog Days of Summer
It's hot. Summer is in full swing and who doesn't love being outside in the heat? Most people use summer time to soak up nature's vitamin D, enjoy time with friends and relish in the beauty of the outside world. I bet some of you take your dogs outside with you. Did you ever ask them if they're too hot? (If you did, did they answer??). My point is that even the fur children in our lives get hot and sweaty. So how do we cool them off and get them to feel like this:


?????
Well, it simple. You Frost Them. Little Dehlia's Frosty Collars are a wonderful New England based company with the most creative design to cool our pups. The owners and designers, Andy and Annie have come up with the most genius idea yet. COOLING COLLARS. Yes. Cooling collars. In a variety of patterns and sizes, this patent pending design is top notch and will keep your furry baby happy in the sun. What do they look like? Well, like this:
Are those the only patterns? Nope. Multiple sizes and patterns are available. Even for the patriotic pup in your life
I don't know about the rest of you, but here in the southeast it gets HOT. Add in three long haired dogs like mine and you need Little Dehlia's Frosty Collars in your life by your pups will love you even more for it. So how do you get them? It's so easy and awesomely simple. Visit www.frostycollars.com
You'll find all the product information, images, products in stock for sale an much more. Social media site links so you can follow their Etsy and Facebook feeds too! So go, visit Little Dehlia's Frost Collars and let your pups chill.
Thursday, June 27, 2013
A Delightful Dessert
The sweetly talented Ms. Tiffany Anderson baked a treasure for me! Her home based business, Delightful Desserts was running a Facebook contest and I won! Me! I mean, I never win anything so it never occurred to me that I may actually win. But I did. So we talked about preferences and pickup times. I went today to get my awesome cake and oh. My. Gosh.
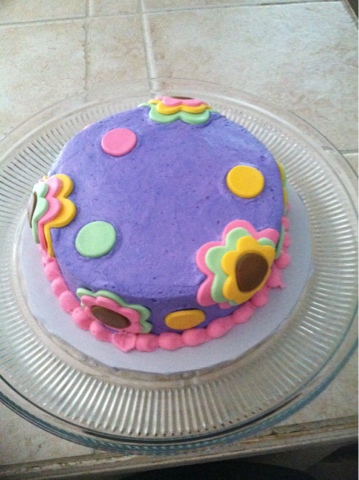


Look at how cute that is. And the flowers are adorable.
My munchkin was so excited about a purple cake because purple is her favorite color this week.
She was more excited when I sliced it.
This thing tastes as good as it looks! I could eat the whole thing if I weren't so concerned with my figure. :) if you're local to the upstate, visit Tiffany and let her know you'd love one of her delightful desserts. www.facebook.com/delightfuldessertsbytiffany
Double Trouble
I title this entry 'Double Trouble' because today marks a wonderful day for Jeanine. The poor gal was working two full time jobs and raisin four kids so I went from seeing her three days a week to once every three weeks. But yesterday was her final day at her secondary employment which means (drumroll please) I get my bestie time back. :).
To celebrate today we are headed out to lunch and to pick up a cake from Delightful Desserts. I'll blog about it once its here!
Seriously, tell me what tutorial you'd like to see next. :-)
Monday, June 24, 2013
Tutorial time!!
Ok guys and dolls, here it is; my tutorial for how to turn your jeans into a cute denim skirt. Now, even after I've told and shown you how to do this, if you still decide you'd rather not try it yourself let me know. I AM available for custom jobs, always.
Now you know you have a pair of jeans sitting in your closet that are either too short, or the hems are threaded from you walking on them. Or maybe your little one (or your dog) or even you have spilled something on them and they have a stain. You're still holding on to them. I just know it. Well, pull them out and let's get to work! It's summer time and denim skirts are always in style. Lets transform your old jeans into something fabulous.
*before I start, please know I'm uploading all this from a mobile device so if the pictures are out of order I do apologize.
Here's what you'll need:

-jeans
-needle and thread
-scissors
-straight pins
~Put the jeans on and mark where you'd like the skirt to fall. Take them off, lay them flat and cut the legs off. Set them aside for later use.

~Once the legs have been cut off, it's time to cut out that pesky inseam. (Note: you can leave the extra denim there if you have a seam ripper. I do not, so I cut it off. It makes no impact on the look of the skirt). Now your skirt should lie flat.


~You will notice that more material is missing from the front than the back. (Jeans have more material in the back for our booties). This isn't a big deal. Just lie them out and cut so the missing material is even. Now into the legs.....


~Take the legs of the denim and cut them in half so that the leg is open. Cut again. Use the leg of the denim to fill the space missing from the front and back of your skirt. Pin into place. Now comes the fun part....


I hand sewed the denim into the triangle shaped space and removed the pins. Then I pulled out my sewing machine just to reinforce it. If you have mad skills at hand sewing you can just do that. If you have a sewing machine you can just use your machine. It's up to you. I used brown and blue threads for a contrast but again, that is your choice. Once it attached, turn the skirt inside out and trim the excess denim away. Don't worry about the rough edge on the exposed side of the skirt. It will be frayed. Now what about that hem??

~ I'm not going to lie, hemming things is not my specialty, and I personally like the look of a frayed edge. But how do we make that happen? It's all about the wash. Seriously. Wash it and dry it. When it comes out of the washer you will notice long strings. Don't worry about those yet. Once it is dried, bring out your scissors again and trim those long white and blue threads away. You're left with a soft frayed hem and contrast on the exposed surfaces where you sewed the denim

Get creative with it! Use a contrasting or patterned fabric instead of denim in the triangular space. If you don't like a frayed hemline, sew on a lace trim! The possibilities are endless.
One more fun thing for you. I've noticed that patterned denim is all the rage this season. But did you know you can do it yourself at home? It's so easy! Lay your denim out and draw on it with a bleach pen. Seriously it is that simple. I don't have a bleach pen but I do have bleach and q-tips. I used those items to add polka dots to a scrap of denim to show you how quick it can be!

Remember, be safe with your project. Keeps scissors, needles, bleach and other grown up products out of reach of children.
Subscribe to:
Posts (Atom)