Monday, July 22, 2013

Another recommendation

Since you guys don't seem too interested in what I'm doing I thought I would once again make an entry on something I saw on Facebook or Pinterest and tried for myself. So here goes:

Hardwood floor polish. Yes. Hardwood floor polish. Our home is hardwoods throughout aside from the bathroom and lichen of course. But I saw this thing on Facebook, about a recipe for a hardwood floor polish concoction. So I figured why not. This is the recipe:
I made the following changes:  I don't know about the rest of you, but olive oil is expensive!!!!  I can't afford to just toss it on my floors. So I use a different type of oil. Also, I did not have lemon juice in a bottle. But I did have lemons. (Yes, I'm THAT mom). So there I am, literally squeezing lemons in my kitchen and realize three lemons only yielded about one quarter of a cup. So I squeezed a few lines. I thought 'citrus is citrus'. Anyway. I put the oil and lemon/lime juice into my bucket and added very hot water. Then I sloshed it around win my mop. I wrung it out well as stated in the image and began to mop. I mopped all of the hardwood floors in the house and once the floor was dry, snapped an 'after' picture. (Don't worry. I took a 'before' picture as well) This is what I ended up with:
The before picture was taken with natural lighting, and the after was snapped with the overhead light on. But you get the general idea. It is something that I may make a monthly routine but I will need a second mop. This is why:

There are things these Pinterest and  Facebook posts don't tell you. Enter Jenny. 
1) mix concoction well or it will look like you're just swabbing oil into your floor
2) it takes forever to rinse the oil out of your mop so perhaps you use a second mop entirely for polish
3) the bucket will be oily when you're finished. Dawn dish detergent gets the bucket clean. If you can remove your mop head, toss it in the washer alone and add baking soda to your detergent. It helps. 

If you have a better remedy to keep hardwood floors looking awesome, let me know!!!!!!

Oh, I you want something else reviewed just give me a shout. I love this stuff. 

Saturday, July 13, 2013

A few of my favorite things

So, I was introduced to a talented woman named Heather through an auction I participated in. (www.facebook.com/adoorablewreathsbyheather)

She is amazing. And offering so many wonderful thing. Seriously. Lets talk rhinestones. I'm good with them on shoes, bouquets, bow organizers, etc. but a badge reel?  No. But Heather. She can do anything. I was the gracious recipient of a free reel for participating in a giveaway she held. (I paid shipping) oh my goodness it's beautiful!!
See. It's wonderful. And I'm so excited for it to arrive. But that's not all she can do. Her newest product is flamed cell phone cases. Now. You've seen glam, but you haven't seen "Heather glammed". And she can do anything. 
She's clearly a Texans fan but can do practically anything your mind can conjure. Heather hosts multivendor auctions quite frequently and the creativity you'll find on her page (A-Door-Able Wreaths by Heather) is endless an astounding. So when you stop by, be sure to tell her I sent you as enjoy her wonderful things. 

Oh...and her wreaths?  They're awesome. 


Friday, July 12, 2013

July is half over?

Yes. Sadly 2013 is zooming by. I'm not certain to what level it is speeding for you all but for me it is rapid. I seems as if time passes more rapidly these days. Or perhaps I'm just an old lady now. :). 

I wanted to post a tutorial today but no one mentioned anything that they would like to see. So instead, later tonight once my Munchkin is in bed I will post about a favorite product of mine. 

And just in case anyone is actually reading my blog, of you visit the Facebook page and place an order, mention this entry and you'll receive free item with purchase AND discounted shipping rate! 

www.facebook.com/creativecuties 

Sunday, June 30, 2013

Dog Days of Summer

It's hot. Summer is in full swing and who doesn't love being outside in the heat?  Most people use summer time to soak up nature's vitamin D, enjoy time with friends and relish in the beauty of the outside world. I bet some of you take your dogs outside with you. Did you ever ask them if they're too hot?  (If you did, did they answer??). My point is that even the fur children in our lives get hot and sweaty. So how do we cool them off and get them to feel like this:
?????

Well, it simple. You Frost Them. Little Dehlia's Frosty Collars are a wonderful New England based company with the most creative design to cool our pups. The owners and designers, Andy and Annie have come up with the most genius idea yet. COOLING COLLARS. Yes. Cooling collars. In a variety of patterns and sizes, this patent pending design is top notch and will keep your furry baby happy in the sun. What do they look like?  Well, like this:
Are those the only patterns?  Nope. Multiple sizes and patterns are available. Even for the patriotic pup in your life
I don't know about the rest of you, but here in the southeast it gets HOT. Add in three long haired dogs like mine and you need Little Dehlia's Frosty Collars in your life by your pups will love you even more for it. So how do you get them?  It's so easy and awesomely simple. Visit www.frostycollars.com
You'll find all the product information, images, products in stock for sale an much more. Social media site links so you can follow their Etsy and Facebook feeds too!  So go, visit Little Dehlia's Frost Collars and let your pups chill. 


Thursday, June 27, 2013

A Delightful Dessert

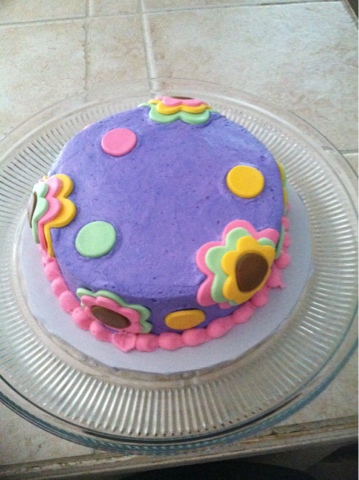
The sweetly talented Ms. Tiffany Anderson baked a treasure for me!  Her home based business, Delightful Desserts was running a Facebook contest and I won!  Me!  I mean, I never win anything so it never occurred to me that I may actually win. But I did. So we talked about preferences and pickup times. I went today to get my awesome cake and oh. My. Gosh. 

Look at how cute that is. And the flowers are adorable. 
My munchkin was so excited about a purple cake because purple is her favorite color this week.

She was more excited when I sliced it. 
This thing tastes as good as it looks!  I could eat the whole thing if I weren't so concerned with my figure. :) if you're local to the upstate, visit Tiffany and let her know you'd love one of her delightful desserts. www.facebook.com/delightfuldessertsbytiffany


Double Trouble

I title this entry 'Double Trouble' because today marks a wonderful day for Jeanine.  The poor gal was working two full time jobs and raisin four kids so I went from seeing her three days a week to once every three weeks. But yesterday was her final day at her secondary employment which means (drumroll please) I get my bestie time back. :). 

To celebrate today we are headed out to lunch and to pick up a cake from Delightful Desserts. I'll blog about it once its here!  

Seriously, tell me what tutorial you'd like to see next. :-)

Monday, June 24, 2013

Tutorial time!!

Ok guys and dolls, here it is; my tutorial for how to turn your jeans into a cute denim skirt. Now, even after I've told and shown you how to do this, if you still decide you'd rather not try it yourself let me know. I AM available for custom jobs, always. 

Now you know you have a pair of jeans sitting in your closet that are either too short, or the hems are threaded from you walking on them. Or maybe your little one (or your dog) or even you have spilled something on them and they have a stain. You're still holding on to them. I just know it. Well, pull them out and let's get to work!  It's summer time and denim skirts are always in style. Lets transform your old jeans into something fabulous. 

*before I start, please know I'm uploading all this from a mobile device so if the pictures are out of order I do apologize. 

Here's what you'll need:


-jeans
-needle and thread
-scissors
-straight pins

~Put the jeans on and mark where you'd like the skirt to fall. Take them off, lay them flat and cut the legs off. Set them aside for later use. 

~Once the legs have been cut off, it's time to cut out that pesky inseam. (Note: you can leave the extra denim there if you have a seam ripper. I do not, so I cut it off. It makes no impact on the look of the skirt). Now your skirt should lie flat. 


~You will notice that more material is missing from the front than the back. (Jeans have more material in the back for our booties). This isn't a big deal. Just lie them out and cut so the missing material is even. Now into the legs.....


~Take the legs of the denim and cut them in half so that the leg is open.  Cut again. Use the leg of the denim to fill the space missing from the front and back of your skirt. Pin into place. Now comes the fun part....


I hand sewed the denim into the triangle shaped space and removed the pins. Then I pulled out my sewing machine just to reinforce it. If you have mad skills at hand sewing you can just do that. If you have a sewing machine you can just use your machine. It's up to you. I used brown and blue threads for a contrast but again, that is your choice. Once it attached, turn the skirt inside out and trim the excess denim away. Don't worry about the rough edge on the exposed side of the skirt. It will be frayed. Now what about that hem??

~ I'm not going to lie, hemming things is not my specialty, and I personally like the look of a frayed edge. But how do we make that happen? It's all about the wash. Seriously. Wash it and dry it. When it comes out of the washer you will notice long strings. Don't worry about those yet. Once it is dried, bring out your scissors again and trim those long white and blue threads away. You're left with a soft frayed hem and contrast on the exposed surfaces where you sewed the denim

Get creative with it!  Use a contrasting or patterned fabric instead of denim in the   triangular space. If you don't like a frayed hemline, sew on a lace trim!  The possibilities are endless. 

One more fun thing for you. I've noticed that patterned denim is all the rage this season. But did you know you can do it yourself at home?  It's so easy!  Lay your denim out and draw on it with a bleach pen. Seriously it is that simple. I don't have a bleach pen but I do have bleach and q-tips. I used those items to add polka dots to a scrap of denim to show you how quick it can be!  


Remember, be safe with your project. Keeps scissors, needles, bleach and other grown up products out of reach of children.